Recipe Book & Meal Planning Notion Template (free download)
Welcome to our Recipe Book and Meal Planning Notion Template! This is a great template for those looking for a place to store recipes and plan their weekly meals. We find that it’s more efficient to get all ingredients in one trip to the grocery store. It tends to make it easier to eat healthily, save time, and cut down on eating out. If you’re new to Notion we recommend that you check out our article on how to get started with Notion!
You can get this Recipe Book and Meal Planning Notion Template through Gumroad and find our tutorial below:
Tutorial
When you first download our template, you’ll notice that it is divided into three sections “Recipe Book”, “Meal Planning Calendar”, and “What’s in my fridge?”. What is unique about this template is that the three sections work together so that you can seamlessly add your recipes as dishes into your weekly meal planning, and check what ingredients are available!
How to Use the “Recipe Book”

Overview:
The Recipe book section of the template is a place where you can see all of the recipes you’ve added in one place! You can easily find different meals that you’re looking for using the filtered tabs like “Breakfast”, “Lunch”, “Dinner”, and “Snacks”.
You can also search for each recipe by ingredient if you add an ingredient tag. Click “Filter”, and choose your ingredient tag to look for recipes in this method!
Each recipe will open up with detailed information that includes how to prepare it, what kind of meal it is, and more!
Add a new recipe:
When you want to add a recipe, click “+New” in the “View all” tab of the Recipe book. Then make sure to add a cover photo, title, rating, meal, type, ingredients, servings, and instructions, calories, and ingredient tags for easy searching. For more categories in either the “Meal or “Type” section, you can easily create them as well.
If you want the ingredients to work seamlessly with the meal planning section, make sure that your ingredients are added with dashes “-”. Make sure to use “Shift-Enter” on the keyboard when adding each ingredient to keep the formatting for later. This helps with copy-pasting into your shopping list. For example, an ingredients list for Avocado Toast would look like this
– 1 slice of bread (dark-rye)
– ½ ripe avocado
– Pinch of salt
– 2 eggs (poached)
On the same page, import the “New Recipe” sub-template below. This sub-template will allow you to store relevant links relating to the recipe.
Using Notion’s Web Clipper to add recipes!
If you want an alternative way to add recipes, you can use Notion’s Web Clipper. Make sure you have Web Clipper installed in your browser. We’ll leave the link to our Notion Web Clipper tutorial below! You can look for the database for your recipes and add them directly there. You’ll have to add the other relevant information later after they are imported to your Notion page.
How to use “What’s in my fridge?”
This section shows what items are currently available in your pantry or fridge. To add a new fridge/pantry item, click “+ New”. You can add the name, status, link (if ordering online), type tag, and connect to recipes if needed. You can also connect ingredients through the recipe book section.
How to use the “Meal Planning Calendar”
Overview:
The next part of this template is the “Meal Planning Calendar”. This section helps to plan for the week. At first glance, you’ll see name, start and end date, budget, actual cost, and a place to add your receipt copy. This will help you track your spending with meal planning and see which weeks worked better than others.
Add a new week:
To add a new week, click “+New” in the “Meal Planning Calendar”. Name the week, and add the start date, end date, and budget to start.
Click “Open” to open up the week. Import the sub-template inside called “New Meal Planning” to get started.
Adding meals to your week:
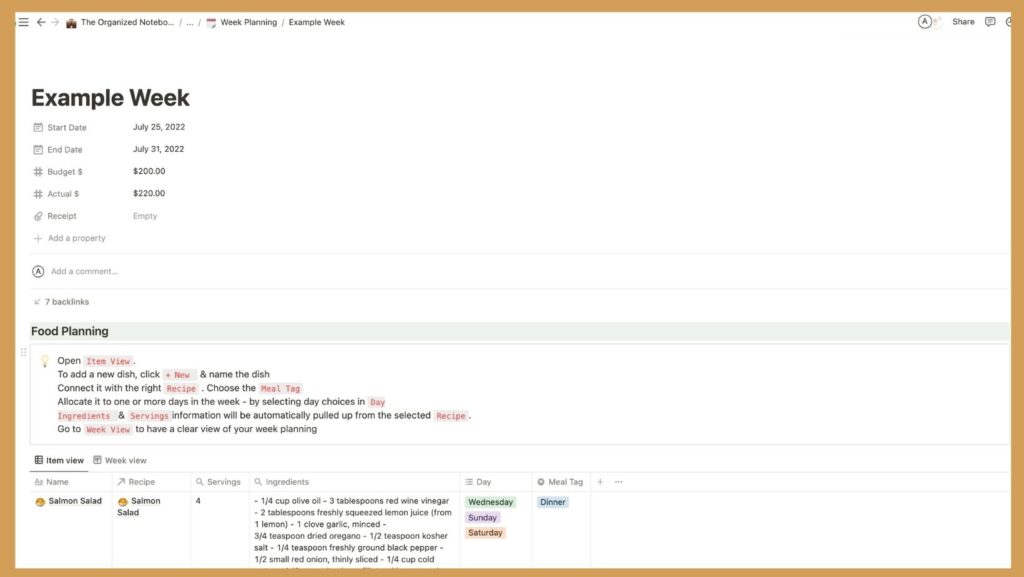
Inside the week, go to “Item View” from the “Food Planning” section. To add a new dish, click “+New” and name the dish.
Connect it with the right “Recipe” which are the recipes that come from the “Recipe Book”. This is important so all the recipe information is directly shown in your meal planning.
Allocate it to one or more days in the week – by selecting day choices in “Day”. Choose the meal tag. “Ingredients” and “Serving” information will be automatically pulled up from the selected “Recipe”. Once you’re done, you can go to “Week View” to have a clear view of your week planning.
“What’s in my Fridge?”
This is included so that you can easily see what is currently available while making your shopping list! If you need, you can also add the ingredients that you need through this area by clicking “New”.
Make your Shopping List:
Once you’re done planning your week, you can make a shopping list to get all the items you need for the week. This is easy to do by copying the entire column of ingredients in the “Item View”.
Paste it into the “Shopping List” section. Remove any unwanted ingredients or ingredients you already have. Highlight all the ingredients and click the six dots on the left. Then, select “Turn into” → “To-Do List”. This will convert your entire list into a checkbox list so you can easily shop for your items!
Notes section:
The last section is for you to write any notes down. This can include information like your reflection after planning the week. You can ask yourself, “What worked and what didn’t work?”. It can also be a great place to note any outside meals you had or anything else you can think of related to your week of meal planning!
3 comments
I love the template bcs it’s beautiful and helpful
I want the template because it’s so pretty.
I love the template