How to Build a Daily Planner in Notion: A Step-by-step Guide ( + free template)
Notion is a powerful tool for organizing your tasks and keeping track of your daily activities. In this article, we will guide you through the process of creating a daily planner in Notion. Having a daily planner provides structure and organization to your day, ultimately leading to increased productivity, better time management, and reduced stress levels in managing a complicated workflow. By the end of this guide, you will have a functional daily planner template that streamlines your planning process!
Wonder about the benefits of having a daily planner in Notion?
- Organization: Having a daily planner helps you stay organized and keeps all your tasks, appointments, and commitments in one place. It allows you to plan your day ahead and prioritize your activities.
- Productivity: By using a daily planner, you can allocate specific time slots for different tasks, helping you manage your time effectively. It helps you avoid procrastination and ensures that you stay on track with your goals.
- Goal Setting: A daily planner allows you to set daily goals and break them down into manageable tasks. It helps you stay focused and motivated, as you can track your progress and see what you have accomplished throughout the day.
- Time Management: With a daily planner, you can allocate time for both essential tasks and leisure activities. It helps you find a balance between work and personal life, ensuring that you make time for self-care and relaxation.
- Reduced Stress: By planning your day in advance, you can reduce stress and anxiety. You have a clear overview of your tasks and deadlines, which helps you prioritize and tackle them efficiently.
So, let’s wait no more and start building it!
Let’s start building your daily planner in Notion!
We hope this build-with-me tutorial will help you get started with Notion and create an amazing journal space for you to organize and reflect on your thoughts. We recommend you open your Notion workspace and follow our video at the same time so you can learn faster by building. You can also download the finished template for free below!
Steps to Set Up Your Daily Planner
1. Set the layout
- Start a New Page: Open a blank Notion page and give it a title. Let’s name it “Daily Planner.”
- Add a Cover Photo: Click on “Add Cover” and select an image from Unsplash to use as your cover photo. This image will give your planner a visual touch.
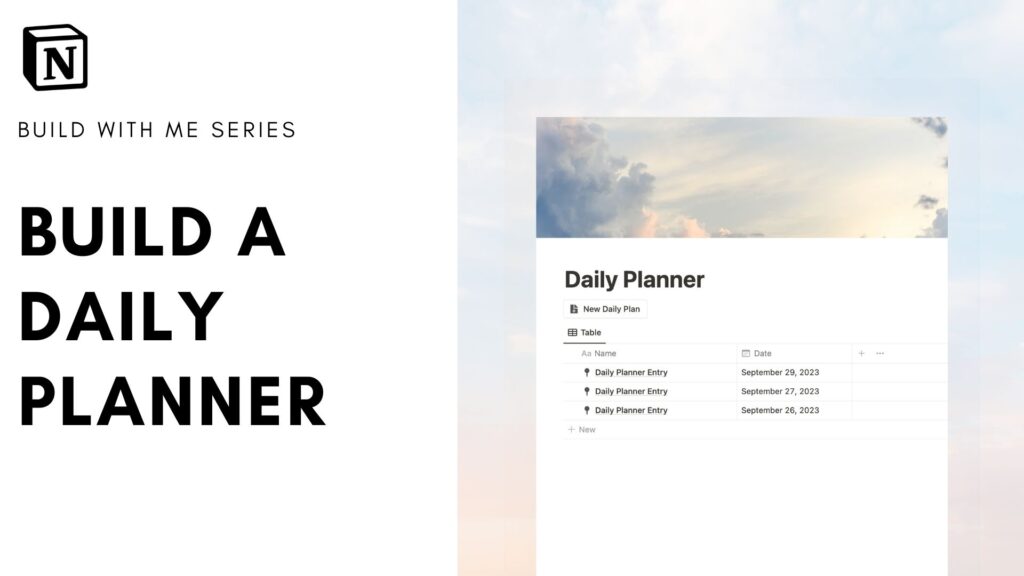
2. Creating the Daily Planner Database
- To manage your daily planning entries in a central database, type
/tableand select “Table View” to create a table-based database. - Name this database “Daily Planner Entries.”
- Adding Key Properties:
- Name: This is where you can provide a name or title for each entry.
- Date: This property is crucial for tracking your daily plans.
3. Creating a default template
- Create a new template: Click on the arrow icon next to “Daily Planner Entries” and select “Add a New Template.”. Title the template “Daily Planner Entry.”
-
Set the Layout: Divide your daily planner entry into two main columns: one for your daily plan and the other for your priorities and to-do list. You can create columns by typing
/columnand selecting “Two Columns.” - Daily Plan: Add hours on the left side and describe your activities for each hour on the right.
- Priorities and To-Do List: Use bullet points to list your priorities and check boxes for tasks for the day.
- Customize further: arrange the layout to suit your planning style.
4. Using Buttons for Easy Navigation
Add a Button for Creating New Entries:
- Create a button to quickly add new daily planner entries. To do this, type
/buttonand customize it with an icon and label, such as “New Daily Plan.” - Add a step to create a new page in the “Daily Planner Entries” database and name it “Daily Planner Entry”. Add another step to open the new page in full view.
Add a Button for Navigate Back to the Homepage:
- To make it easy to navigate back to your daily planner from individual entries, edit the “Daily Planner Entry” template.
- Add a button with an icon, like a house, and label it “Back to Daily Planner”. Configure the button to open the “Daily Planner” page in full view.
You made it! A Clean and Functional Daily Planner
With these steps, you’ve created a clean and functional daily planner in Notion. You can add new entries with ease, navigate seamlessly between your planner and individual entries, and keep your daily plans organized and structured. To keep your entries organized, we recommend you sort your daily planner entries by date in descending order, so the newest entries appear at the top.
New to Notion?
Learn more about Notion from our classes: We recommend you check out our tutorials and build-with-me tutorial series to learn Notion more efficiently by practicing and building. Keep experimenting with Notion functions and you will surely find a way to adapt them to your specific needs!
✨ Interested in trying out Notion? Notion has free plans for all users as well as paid plans for more advanced features and you can sign up here
✨ Interested in Notion AI? If you like to try to see how Notion AI automates your workflow, find the link to sign up here.
Full disclosure: we are a Notion Partner, so when you sign up with our link, you also help support us and our content!
Download our templates
For the finished version of the template that we built during the build-with-me tutorial, download it for free below and check if everything is the same as your version! Enter code DAILY100 to get it for FREE we do this to prevent bots from downloading our entire library! ❤️
If you prefer a pre-made template with more built-in functions, be sure to check our Daily, Weekly, and Monthly Planner Notion Template. This is the perfect planner if you want a way to plan your day, week, and month seamlessly. There are additional spaces for reflections and goal setting!
If you have any questions or need further clarification on any of the steps discussed, please don’t hesitate to ask us!