How to build a Digital Notebook in Notion: A step-by-step guide ( + free template)
In this tutorial, we’ll walk you through the process of building a digital notebook using Notion. With this digital notebook, you can efficiently manage and organize your notes across various notebooks, making it easier to keep track of your information.
Wonder about the benefits of having a digital notebook in Notion?
- Organization: A digital notebook allows you to keep all your notes in one centralized location. You can create different sections or notebooks to categorize your notes based on topics, projects, or subjects, making it easy to find and retrieve information when needed.
- Searchability: With a digital notebook, you can quickly search for specific keywords or phrases within your notes. This saves time compared to flipping through physical pages or scrolling through a handwritten notebook.
- Accessibility: A digital notebook can be accessed from various devices, such as your computer, tablet, or smartphone. This means you can view, edit, and add new notes anytime and anywhere, as long as you have an internet connection.
- Flexibility: Unlike traditional notebooks, digital notebooks offer flexibility in terms of formatting and organization. You can easily rearrange, reorganize, and customize your notes, add multimedia elements like images and videos, and interactive elements such as checkboxes, links, and tables.
- Backup and Sync: Digital notebooks are usually stored in the cloud, which means your notes are automatically backed up and synced across devices. This ensures that your notes are safe from loss or damage and allows for seamless transitions between devices.
Overall, a digital notebook offers significant benefits in terms of convenience, efficiency, and flexibility in organizing and managing your notes. This makes it an invaluable tool for both personal and professional use. So, let’s wait no more and start building it!
Let’s start building a Notion digital notebook!
We hope this build-with-me tutorial will help you get started with Notion and create an amazing space for you to organize your notes and improve your note-taking process. We recommend you open your Notion workspace and follow our video at the same time so you can learn faster by building. You can also download the finished template for free below!
Steps to Set up Your Digital Notebook
1. Set the layout
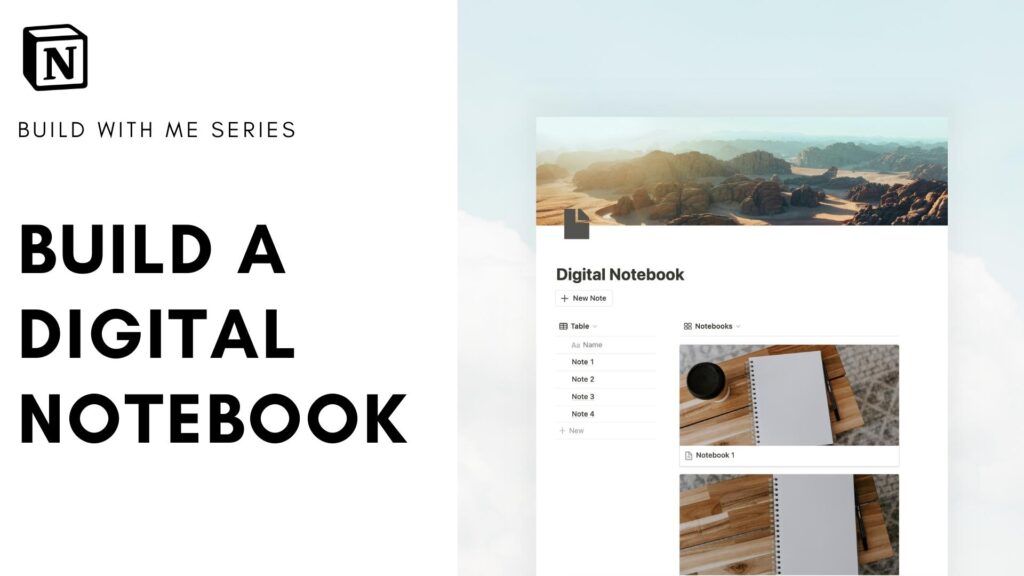
- Create a New Notion Page: Begin by opening a new Notion page and giving it a title. We’ll call it “Digital Notebook.”
- Add a Cover Photo: Click on “Add Cover” and choose a cover photo. You can browse Unsplash for a wide selection of stock images to personalize your notebook’s look.
- Organize the Page Layout: Optimize your page layout by selecting “Small text, full width” from the top-right corner. This maximizes your workspace.
- Your digital notebook will consist of two main components: “Notes” on the left and “Notebooks” on the right. To visually divide the page, use Notion’s “Column” feature.
- Type
/columnto create two columns: one for “Notes” and one for “Notebooks.”
2. Set Up the “Notes” Database
- Create a table view database for your notes. To do this, type
/tableand select “Table View.” Name this database “Notes.” - Delete any default rows and properties, keeping only the necessary ones.
- Configure properties as follows:
- Name: This field allows you to provide a title or heading for each note.
- Date: Use this property to record the date of the note.
- Tags (optional): Consider using tags to categorize your notes based on content or topics.
- Create a Template for Notes (Optional): Design a template for your notes by clicking on the arrow icon next to “Notes” and selecting “Add a New Template.” This template will streamline your note-taking process.
3. Set Up the “Notebooks” Database:
- Create a gallery view database for your notebooks. To do this, type
/gallery. Name this database “Notebooks.” - Customize the properties, for example by removing unnecessary properties like “Tags” and “Created.”
- Add Notebook Covers: Enhance your notebooks by adding cover photos. Click on each notebook and select “Change Cover.” Choose an appropriate image for each notebook.
- Hide Database Titles: To maintain a clean look, hide the database titles for both “Notes” and “Notebooks.” You can do this by clicking on the three dots in the respective databases, going to “Layout,” and toggling off “Show Database Title.”
4. Add relations between two databases “Notes” and “Notebooks”
- Establish Relations: Open a note and add a relation property to link it to a notebook. Configure the relation property to display on the “Notebooks” database.
- Assign Notes to Notebooks: Link each note to its corresponding notebook by selecting the appropriate notebook in the relation property field.
- Optimize the Notebook View: Customize the view within each notebook by going to the three dots, selecting “Edit,” and using “Show as” and “Minimal” options. This declutters the view, displaying only linked notes.
- Creating a Default Template for New Notebooks: Create a default template for new notebooks to maintain consistency in your notes. Click on the arrow icon next to “Notebooks” and select “Add a New Template.”, then set up a linked view of notes within this template, specifying the filter and sorting options for the view.
- Customize the Template: add headings, sections, or layouts that suit your note-taking style.
5. Time-Saving Tips
Utilize Note Templates: One way to enhance your note-taking experience is by creating note templates for different purposes. These templates can be used for various scenarios, including meeting notes, outlines, or study notes. By having predefined formats readily available, you can save time and ensure consistency in your note-taking process.
Streamline Note Creation: To make the process of creating new notes faster and more efficient, consider adding a “New Note” button. This button can be placed in a convenient location and when clicked, it will automatically open a new note page. Additionally, it can provide a step-by-step guide to assist you in capturing the necessary information effectively.
Congratulations! You’ve successfully created a digital notebook in Notion.
With this organized system, you can manage your notes across different notebooks efficiently. Whether you’re taking meeting notes, jotting down ideas, or studying, this digital notebook setup ensures you stay organized and productive.
New to Notion?
Learn more about Notion from our classes: We recommend you check out our tutorials and build-with-me tutorial series to learn Notion more efficiently by practicing and building. Keep experimenting with Notion functions and you will surely find a way to adapt them to your specific needs!
✨ Interested in trying out Notion? Notion has free plans for all users as well as paid plans for more advanced features and you can sign up here
✨ Interested in Notion AI?: If you like to try to see how Notion AI automates your workflow, find the link to sign up here.
Full disclosure: we are a Notion Partner, so when you sign up with our link, you also help support us and our content!
Download our templates
For the finished version of the template that we built during the tutorial, download it for free below and check if everything is the same as your version! Use code NBOOK100 to get it for free
✨ Although it’s free, we would greatly appreciate any support so that we can continue doing this. ❤️
For more premium templates, we offer note-taking templates bundle and topic cover photos in our store. This bundle features a place to store your notes and topics, as well as 15 different types of note-taking templates. We believe you should use different methods for note-taking depending on your needs. In this bundle, we’ve included a Cornell note template, outline note template, chart note template, SQ3R note template, and more!
Check out our note-taking bundle template tour!