10 Best Tips to Use Timeline in Notion | Step-by-Step Tutorial (2024)

Did you know Notion is a great timeline tool for projects and tasks?
Presenting projects in a timeline format can provide a clear view of your tasks, schedules, and projects. With Notion Timeline, you can easily track deadlines, set milestones, and ensure that all your tasks are aligned, making your project management effective.
In this article, we will cover the top 10 tips about timeline view in Notion from beginner to advanced tips. These tips will help you structure and visualize information, manage workload, and organize your tasks in timeline mode more efficiently. Let’s dive right in!
Tip 1. Master Four Ways to Create Timeline Databases in Notion
There are three main methods to create a timeline view in Notion. Depending on the context and your specific needs at a given moment, one method might be more suitable than the others.
- Transform an Empty Page into a Timeline Database: If you're already working on a page that you'd like to convert into a database, go to the three dots at the bottom of the page, and click on 'Timeline'. This will transform the current page type into a database.
- Create an In-Line Timeline Database with an Empty Page: Begin with an empty Notion page, type '/Timeline', and then click on 'Timeline View'. This will create an inline Notion Timeline database
- Using an Existing Timeline View Database: If you already have an existing database in Notion, you can add timeline as a linked view database. All you have to do is type "/linked view of database" and select the correct database that already is in a table view. Any changes you make here will be reflected in the main database.
If you want to convert a different type of database into a timeline view, hover over the setting of the database, go to the three dots, select “Layout”, and convert it into a timeline. Note that this won't show entries unless the database has date properties.

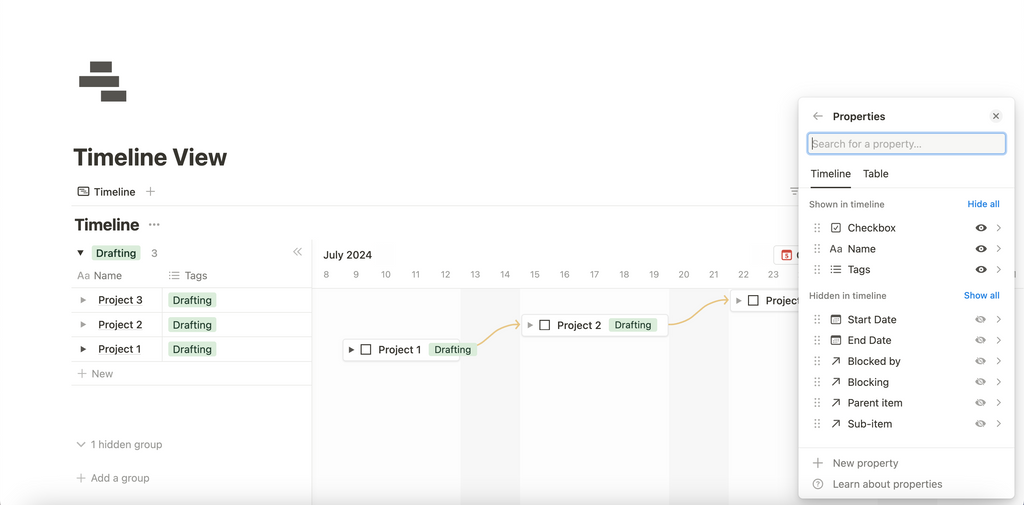
Tip 2. Useful Properties for Timeline Databases
These below properties will help you organize and manage tasks effectively within the timeline view. For the main view, we recommend displaying 1-2 properties to ensure an aesthetic and easy navigation of the timeline view.
- Checkboxes: To track whether a task is completed.
- Tags/ Status: To categorize different phases or types of tasks.
- Date Properties: To set start and end dates for tasks.
- Text Properties: For additional notes or descriptions.
- Select Properties: To assign tasks to different team members or statuses.
- Number Properties: For tracking time estimates or progress percentages.
- Relation Properties: To link tasks to other databases or projects.
Tip 3. Change Time Views
You can change your timeline view to suit your needs, choosing between hours, days, weeks, months, quarters, or years. This lets you customize your perspective and better manage your tasks, projects, and schedule according to the time frame that fits best.

Tip 4. Understand the Basic Layout of the Timeline Database

Show Database Title
You can easily toggle "Show database title" to display or hide the title. Our usual method is to hide the title to ensure an aesthetic and consistent display of databases on our Notion pages.
Separating Start and End Dates
Separating start and end dates in a timeline database allows for more precise tracking of tasks and projects. This helps to clearly define the duration of each task, avoid overlaps, and better manage dependencies and deadlines.
Page Preview
The feature is the 'Open pages in' option. When turned on, hovering over a cell that links to another page in Notion will display a preview of that page, whether it's a side peek, center peek, or full page. This is especially useful for quickly accessing related information without leaving your table.
Show page icon
The feature allows you to show or hide the display of the page icon. This feature is useful for keeping your timeline clear and minimalistic!
Tip 5. Incorporate a table view to strengthen your timeline view
Adding table views to your timeline helps you see properties more clearly, especially when there are many properties. To add a table view together with a timeline view, toggle on “Show table” and select specific properties to display, making it easier to manage and organize tasks.

Tip 6. Learn to Group entries in Timeline View
Grouping entries in the timeline view can be extremely useful for organizing and managing tasks. By grouping tasks based on properties such as tags, status, or assigned team members, you can visualize the progression and relationships between different tasks more clearly. This can help identify bottlenecks, ensure balanced workload distribution, and improve overall project management efficiency.

Tip 7. Master Dependencies in Timeline View
Dependencies in the timeline view allow you to visualize and manage the relationships between tasks. By linking tasks with dependencies, you can ensure that tasks are completed in the correct order and help identify bottlenecks in your project. To add a dependency, simply create a new entry, and then drag an arrow from this task to the one it depends on. This feature helps in maintaining a clear workflow and ensures that all team members understand the sequence of tasks. You can adjust various settings for dependencies to suit your project needs, making timeline management more efficient and effective.
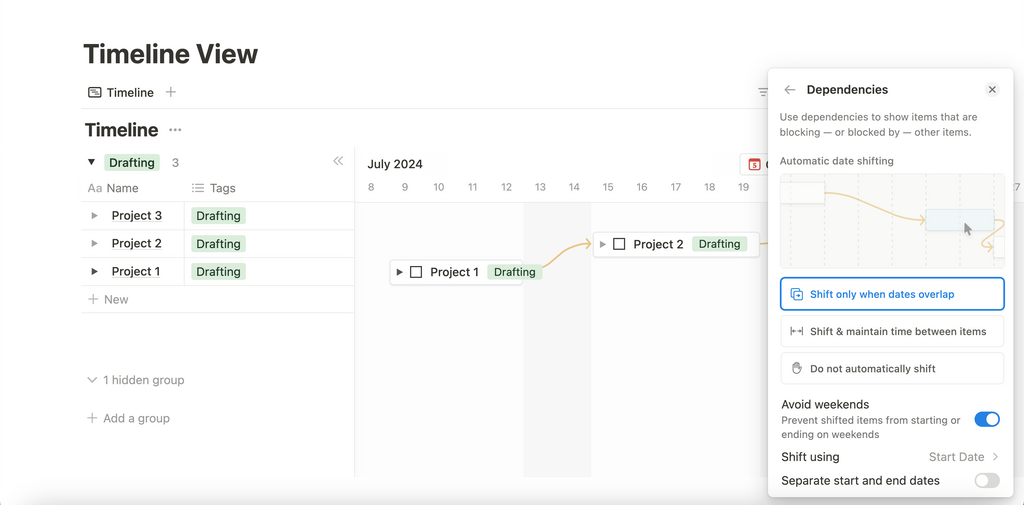
Automatic Date Shifting
Automatic date shifting dynamically adjusts dates based on specific criteria or schedule changes. This feature keeps deadlines, milestones, and events up to date without manual intervention. Automating this process reduces the risk of human error and ensures all stakeholders are promptly informed of any changes. This is particularly useful in project management, where timelines often need revisions due to unforeseen circumstances or new developments.
There are several settings for you to choose from:
- Shift only when dates overlap
- Shift & maintain time between items
- Do not automatically shift
Avoid Weekends
The "Avoid Weekends" function in Notion's timeline view is a feature designed to help you manage your projects more efficiently by automatically adjusting task dates so that they do not fall on weekends. This is particularly useful for teams and individuals who work primarily on weekdays and want to ensure that tasks and milestones are scheduled only on working days. You can avoid delays and ensure that your project stays on track, with all tasks and milestones scheduled appropriately within the working week.
When you enable the "Avoid Weekends" option, any task that would have its start or end date fall on a Saturday or Sunday will be automatically shifted to the next available weekday. This helps in maintaining a consistent workflow and ensures that deadlines are set realistically, taking into account the non-working days.
To enable this feature, simply go to the timeline settings and toggle the "Avoid Weekends" option. This setting can be particularly beneficial for project managers who need to plan tasks and timelines while considering the availability of their team members
Advanced Settings with Blocking & Blocked By in Timeline View
Understanding the advanced settings of "Blocking" and "Blocked By" in Notion's timeline view can significantly enhance your project management efficiency by providing a clear visual representation of task dependencies and workflow bottlenecks. By leveraging the advanced settings of "Blocking" and "Blocked By," you can streamline your project management process, ensuring a smooth and efficient workflow from start to finish.

Blocking: this feature allows you to specify which tasks are preventing other tasks from starting or progressing. When you set a task as blocking another, it indicates that the blocked task cannot proceed until the blocking task is completed. This is crucial for maintaining a logical and efficient workflow, ensuring that dependent tasks are not started prematurely.
To set a task as blocking another:
- Select the task you want to set as blocking.
- Use the timeline view's settings to link this task to the one it is blocking.
- An arrow will appear, indicating the dependency and blockage relationship.
Blocked By: This specifies which tasks are being held up by another task. This helps you identify potential bottlenecks and prioritize tasks that need to be completed to keep the project moving forward. By visualizing which tasks are waiting on the completion of others, you can better manage resources and deadlines.
To set a task as blocked by another:
- Select the task that is being held up.
- Use the timeline view's settings to link this task to the one that is causing the blockage.
- An arrow will appear, indicating the dependency and which task is causing the delay.

Tip 8. Leverage with Sub-Items
Sub-items in a timeline view database allow you to break down major tasks into smaller, more manageable components. This feature is particularly useful for complex projects where a single task may involve several steps or sub-tasks. By enabling sub-items, you create a hierarchical structure within your timeline, providing a detailed view of how tasks interlink and progress.
Sub-items appear as expandable lines beneath their parent tasks or parent projects, making it easy to visualize dependencies and the overall workflow. This helps in better organizing and managing tasks, ensuring that all components of a project are accounted for and appropriately scheduled. Additionally, sub-items can have their own properties, such as due dates, statuses, and assigned team members, allowing for more precise tracking and management.
In summary, sub-items enhance the functionality of the timeline view by offering a granular perspective on task management, improving both clarity and efficiency in project execution.

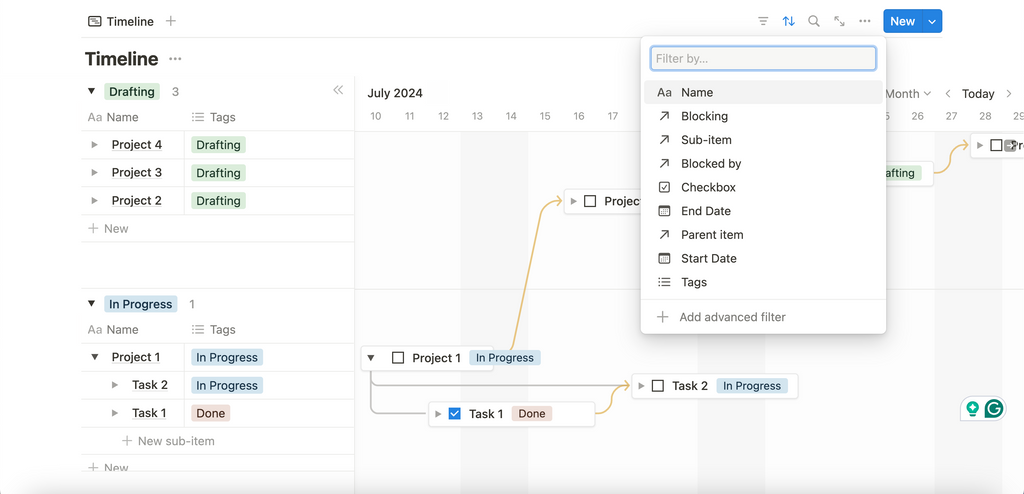
Tip 9. Sort, Filter, and Search Items in Timeline View Database
Managing a timeline database effectively requires the ability to sort, filter, and search items quickly. These functionalities help you organize and find information with ease, enhancing productivity and ensuring that you can focus on what's important.
Sort Items
Sorting items in your timeline database allows you to arrange tasks or projects based on various properties such as start date, end date, priority, or status. This helps in visualizing tasks in a particular sequence, making it easier to follow your workflow and manage deadlines effectively.
To sort items:
- Click on the "Sort" button in the timeline view.
- Select the property by which you want to sort the items.
- Choose the order (ascending or descending) for the sorted items.
Filter Items
Filtering items helps you narrow down your view to specific tasks or projects that meet certain criteria. This is particularly useful for focusing on tasks assigned to a particular team member, tasks with a specific status, or tasks within a certain date range.
To filter items:
- Click on the "Filter" button in the timeline view.
- Add filter conditions based on properties such as tags, date ranges, status, or assigned team members.
- Apply the filter to display only the items that match the specified conditions.
Search Items
The search function enables you to quickly locate specific tasks or projects within your timeline database. By entering keywords or phrases related to the task, you can instantly find and access the relevant information without scrolling through the entire timeline.
To search items:
- Click on the "Search" bar in the timeline view.
- Type in the keywords or phrases related to the task or project you are looking for.
- The search results will display items that match the entered keywords, allowing for quick access.
Tip 10. Integrate with Notion Calendar
Integrating a timeline view database with Notion Calendar is incredibly useful for managing your projects and tasks. This integration allows you to see all your tasks and deadlines in a calendar format, providing a comprehensive overview of your schedule. By syncing your timeline view with Notion Calendar, you can easily track important dates, set reminders, and ensure that nothing falls through the cracks. This seamless integration helps in maintaining a well-organized workflow, enabling you to manage your time more effectively and stay on top of your commitments.

Excited to learn more about Timeline in Notion?
If you are eager to learn more through real-life examples, we strongly recommend you watch our tutorial for a comprehensive, step-by-step video guide below on making the best out of this functionality in Notion. To learn more, read more in Notion’s Official Guide here.