10 BEST tips to create Lists in Notion | Step-by-Step Tutorial (2024)

Looking for a way to organize your to-do lists, inventory, checklists, and more? Notion's List View Databases and Simple lists can be the perfect solution for you. These tools offer a minimal and simple look to add to your Notion workspaces while allowing for a wide range of applications, from task management and simple checklists to content organization and data tracking.
In this article, we'll walk you through the top 10 tips to create a simple, yet highly effective list, which can help you structure and visualize information, manage tasks, and organize data more efficiently. Let’s dive right in!
Tip 1: Understand the differences between Simple Lists vs. List Databases in Notion
Simple lists and list databases in Notion serve different purposes and have various unique features.
Simple Lists: These are useful for quick, straightforward lists where advanced features and customization are not required. You can create to-do lists, bullet lists, numbered lists, and toggle lists with ease. They are ideal for jotting down ideas, creating a checklist, or making a simple step-by-step guide. However, they do not allow for complex data structures or relationships and do not support properties such as tags, dates, or links to other pages.
List Databases: These are more advanced and offer more customization options. You can add properties to each item, such as checkboxes, tags, and links to other pages, enabling you to create complex systems for managing tasks, tracking projects, or organizing information. List databases also allow grouping, filtering, and sorting of items, making them more flexible and dynamic. The added complexity, however, means they might be overkill for simple list-making needs.
In short, you should choose simple lists for quick, uncomplicated lists, and go for list databases when you need more advanced features and customization.
Tip 2: Master Three Ways to Create List Databases in Notion
There are three main methods to create a list database in Notion. Depending on the context and your specific needs at a given moment, one method might be more suitable than the others.
- Transform an Empty Page into a List Database: If you're already working on a page that you'd like to convert into a database, go to the three dots at the bottom of the page, and click on 'List'. This will transform the current page type into a database.
- Create an In-Line List Database with an Empty Page: Begin with an empty Notion page, type '/List', and then click on 'List View'. This will create an inline Notion List database
- Using an Existing List View Database: If you already have an existing database in Notion, you can add lists as a linked view database. All you have to do is type "/linked view of database" and select the correct database that already is in a table view. Any changes you make here will be reflected in the main database.

Source: The Organized Notebook, 2024
Tip 3: Understand Basic Features of List Database
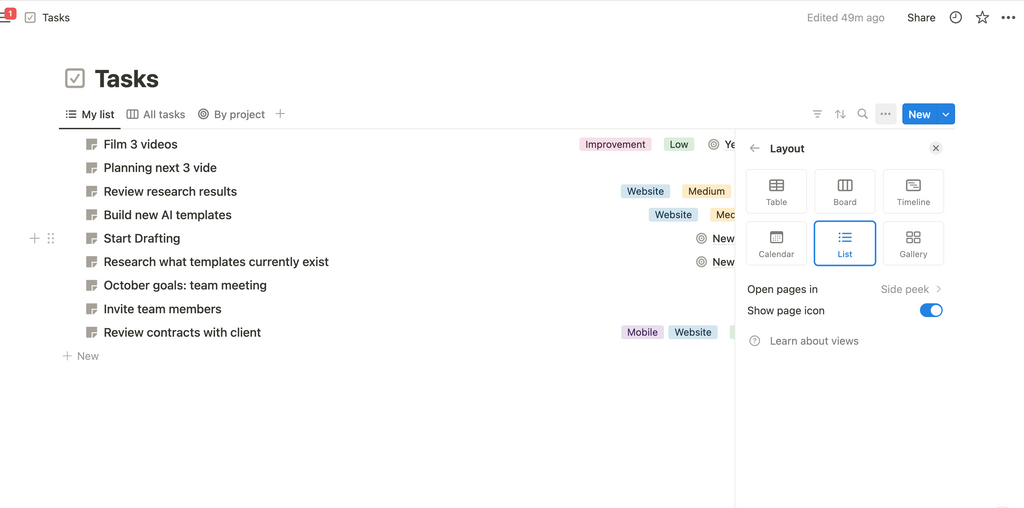
The layout and settings of List View databases are very straightforward. The first feature is the 'Page Preview' option. When turned on, hovering over a cell that links to another page in Notion will display a preview of that page, whether it's a side peek, center peek, or full page. This is especially useful for quickly accessing related information without leaving your table.
The second feature allows you to show or hide the display of the page icon. This feature is useful for keeping your list clear and minimalistic!
Tip 4: Less is more - always go for minimal view!
We recommend using minimal display of properties for lists because it can get overcrowded very easily in a list view database. However, things like the date, person, and other information could be useful depending on what you're trying to show.
Tip 5: Learn to group, filter and sort Items in Your List
Grouping your list items is another really useful way to view your list. Choose to group it by any of your properties. For example, you could group it by the 'created time' and see today's items or priorities to see the tasks with the highest level of importance on the top.
Filtering and sorting are handy features to sort through your items. Filter it by the various properties that you have. For instance, if you want to see the created date, show only today's items or choose various dates.

Tip 6: Creating Numbered List
Creating numbered lists is a bit trickier since it's a database, but it's very feasible. Simply click '+ add a property', and add a number property and fill in the numbers! Don’t forget to display that property on your list view database

Tip 7: Creating a CheckList
Similarly, to create a checklist, add a checkbox property and name it 'done'. Make sure to move the checkbox property to the front. Then you can easily mark the task done as you complete it while staying organized using this simple checklist.

Tip 8: Creating a Bullet List
Creating a bullet list is also possible with a simple circle emoji. To do so, add an icon that is going to be a circle for every list item. Remember to turn on “Show page icon” and create a default database to make sure the circle icon is set in every new page!

Tip 9: Creating a Toggle List
You might be wondering how to create a toggle list in a ListView database. This can be achieved by using a more advanced feature: adding sub-items. When you enable sub-items, every new page you add becomes a sub-page. These sub-pages can be expanded, allowing further pages to be added inside. Additionally, each of these pages can also become a toggle. So, if you're looking for this functionality, consider adding sub-pages.

Tip 10: Use Simple Lists when you don’t need to track the items!

Sometimes, you don't need a complete database for simple lists. To access these, simply type '/list', and you'll see to-do list, bullet list, numbered list, and toggle list. A quick way to generate these is to use command or control + d with the right keyword
- "/bullet" : to create a bullet lists. To change the small circle here to different designs, click the six dots under "list format" and choose between default, disc, circle, or square.
- "/To-do list": when you want to create a simple to-do list
- "/numbered list": when you need a simple numbered list for your items
- “/toggle”:you can also create simple toggle lists or heading style toggle lists
Are you excited to learn more about lists in Notion?
If you are eager to learn more through real-life examples, we strongly recommend you watch our tutorial for a comprehensive, step-by-step video guide below on making the best out of this feature in Notion. To learn more, read more in Notion’s Official Guide here.